Tuesdays with Dorie BWD: Double-Decker Salted Caramel Cake
April 23, 2024 at 8:47 pm | Posted in breakfast things, BWD, cakes & tortes, groups, layer cakes, sweet things, tuesdays with dorie | 8 CommentsTags: baking, brekkie, cake

This month we have a Double-Decker Salted Caramel Cake to celebrate all the April TWD babies: Diane, Kayte and yours truly. My birthday was at the start of the month, but I actually didn’t bake this till this past Sunday, which was Kayte’s big day, so I blew out a candle made a wish for her. This cake was one of her picks, and it’s two layers of soft brown sugar cake, filled and frosted with a sticky caramel icing.
Any good caramel cake should start with a good homemade caramel sauce. There are two tricks to avoid a tooth-ache here…the first is to be brave and take your caramel syrup to a pretty dark place (but don’t go over the edge and burn it, because that is really no bueno), and the second is to season the finished sauce well with salt. The frosting is just a mix of this caramel sauce and powdered sugar with a little heavy cream added, and is a soft consistency that’s more like a thick glaze than a swoopy, swirly frosting. I thought it seemed like not enough when I made it, but scraping my mixing bowl well, I was able to fill and frost the cake, and I think a thin layer is actually all you really need with this one.
For the cake component, I did a bit of fiddling because I wanted to make a smaller 6-inch version, as is my usual MO for the two of us. Looking at the ingredient list and thinking about how best to tackle scaling things back, I first decided that I wanted to use a single full egg and just forget the extra whites. Then I deduced that amount of egg by weight would roughly correspond to 5 tablespoons of butter, and from there I used my calculator to help me do the math to scale down the rest of the ingredients proportionally (about 42% of the original amounts). And then I decided that, while I do have a deep removable-bottom 6-inch pan I could have used here to keep in line with the recipe, I preferred to split the cake batter into two regular cake pans. I don’t really like dividing cakes with a knife– I never get the layers perfectly even or perfectly level and there are always too many crumbs. Also something about having to bake a soft and fluffy cake like this one for 40+ minutes doesn’t sit right with me, and I figured two thinner layers would be out of the oven in way less time. And then, because I am a lazy auto-pilot baker who doesn’t read through a recipe first, I didn’t realize I was supposed to swirl caramel sauce into the cake batter before the pans went into the oven. So I didn’t do that bit. I was kind of mad at myself, but my layers baked beautifully in about 25 minutes, and instead of a caramel swirl inside the batter, I just gave each layer a thin caramel sauce schmear before frosting.

Well that was a pretty long post to come to a short and sweet summary– this cake is delicious! The cake itself is super soft and really flavorful (and it’s awesome drizzled with a little bourbon, in case you were wondering) and the frosting is just the right amount to not to make your fillings zing. I decorated my cake on top with some mixed crunchy pearls and on the sides with some chocolate flakes that I’ve had for like a million years and can now finally say I used up. A successful and satisfying birthday bake!
If you don’t have the book Baking with Dorie: Sweet, Salty & Simple by Dorie Greenspan yet, get it and join us as we bake through it every second and fourth Tuesdays! Don’t forget to check out the rest of the TWD Blogroll and all the other participation deets over on Tuesdays with Dorie!
Tuesdays with Dorie BWD: Goat Cheese-Black Pepper Quick Bread
April 9, 2024 at 12:41 am | Posted in breakfast things, BWD, groups, other savory, quick breads, savory things, snacks, tuesdays with dorie | 6 CommentsTags: baking, cheese, savory

We’re in that in-between weather stage, where one day it’s nice enough to sit on the stoop with a glass of chilled wine, and the next day what’s nice is to sit on the couch with a hot bowl of soup. This Goat Cheese Black Pepper Quick Bread is one you can take to either place– a bread for all seasons. This olive oil-based loaf comes together quickly by hand and is flavored with lemon, fresh mint (although I rarely have that in my herb stash, so I used dried parsley and dill instead) and, of course, goat cheese. Just like you can successfully swap out the mint to your herb of choice, I also think hunks feta or even cream cheese would work nicely here if goat cheese isn’t your thing. The bread has great muffin-like texture, with pockets of creamy cheese and a nice bronzed crust. I added a few extra bloops of cheese to decorate the top of the loaf with, along with a bit more cracked black pepper and some flaky salt.
If you don’t have the book Baking with Dorie: Sweet, Salty & Simple by Dorie Greenspan, get it and join us as we bake through it every second and fourth Tuesdays! Don’t forget to check out the rest of the TWD Blogroll and all the other participation deets over on Tuesdays with Dorie!
Tuesdays with Dorie BWD: Parisian Custard Tart
March 26, 2024 at 12:01 am | Posted in BWD, groups, pies & tarts, sweet things, tuesdays with dorie | 4 CommentsTags: baking, pie

I don’t know about you, but recipes that call for making pastry cream can make me grumble a bit. Often that pastry cream is just one of several components you need to pull together for what you’re making, but for this Parisian Custard Tart, it’s the only thing you really have to prepare. You can choose to make your own crust, but you can also choose to use store bought puff pastry, which I assure you works wonderfully well. This is a simple dessert, just custard and crust, and it’s an everyday, snacky treat in Paris. To me, even though it’s simple, it still feels fancy. The custard is luxurious mix flavored with brown sugar, vanilla and rum that’s baked till it’s a charred, dark brown on top. I was a bit skeptical that the puff pastry was going to cook through, especially on the bottom, but it did, indeed, bake up super-crisp. My custard puffed when it baked and then fell when it cooled, and I was left with kind of a wonky baked custard ledge around the tart. If it happens again, I’ll probably trim it off for the sake of looks, but other than that, no complaints about this tasty one.
If you don’t have the book Baking with Dorie: Sweet, Salty & Simple by Dorie Greenspan yet, get it and join us as we bake through it every second and fourth Tuesdays! Don’t forget to check out the rest of the TWD Blogroll and all the other participation deets over on Tuesdays with Dorie!
Tuesdays with Dorie BWD: Breakfast-in-Rome Lemon Cake
March 12, 2024 at 5:04 pm | Posted in breakfast things, BWD, cakes & tortes, groups, simple cakes, sweet things, tuesdays with dorie | 12 CommentsTags: baking, brekkie, cake

Somehow neither The White Lotus nor seemingly the entire world’s fabulously dreamy Instagram summer vacay pics have spurred me to book a flight to Italy yet, but this Breakfast-in-Rome Lemon Cake may do the trick. I can imagine being pretty happy for a few days to wake up to a double espresso and a slice of the breakfast/snack tube cake known as chiambella. Until I get my passport renewed, luckily Dorie has provided us with her Italian vacation version to bake at home. She makes a lemony separated egg sponge that results in a tall, light, bouncy cake. Berries are optional, but since I had some frozen blackberries in my mess of a freezer, I rummaged around and found them. If I’m going all the way to Italy, I’m not just going to Rome…I’m also going to the Almalfi Coast, so I drizzled the top of my cake with a little limoncello while it was still warm and at its most absorbant for another hit of lemon.
If you don’t have the book Baking with Dorie: Sweet, Salty & Simple by Dorie Greenspan yet, get it and join us as we bake through it every second and fourth Tuesdays! Don’t forget to check out the rest of the TWD Blogroll and all the other participation deets over on Tuesdays with Dorie!
Tuesdays with Dorie BWD: Potato Flake Biscuits
March 12, 2024 at 1:47 am | Posted in breakfast things, BWD, groups, muffins/quick breads, other savory, savory things, tuesdays with dorie | 2 CommentsTags: baking, biscuits

You’d think that with Cook the Book Fridays being behind us, I’d not have so much trouble spitting out just bi-weekly blog posts, but here I am, two weeks late with these Potato Flake Biscuits. At least I did bake them on time for last month’s posting, I promise! I don’t make biscuits or scones very often. It’s not that I don’t like them, I just never crave them like I do cake or ice cream, and I have to be a bit choosey where I spend my pastry calories. I made a half recipe of these biscuits for a more controlled amount (just four squares) for the two of us, allowing me to fairly quickly resume my standard diet of cupcakes.
These savory biscuits came together easily. They are flavored with sautéed onion (I used scallion for extra green bits), some herbs and some Parm. Instant mashed potato flakes are their secret ingredient, which I think gives them a lightness. Really, they had great texture and flavor. I have two of them unbaked in the freezer, and I think I’ll do like Mardi and bake them off to go with chili before the weather warms up.
If you don’t have the book Baking with Dorie: Sweet, Salty & Simple by Dorie Greenspan, get it and join us as we bake through it every second and fourth Tuesdays. Don’t forget to check out the rest of the TWD Blogroll and all the other participation deets over on Tuesdays with Dorie!
Everyday Dorie: Rosa Jackson’s Bourride
February 23, 2024 at 12:01 am | Posted in cook the book fridays, everyday dorie, groups, other savory, savory things, snacks | 8 CommentsTags: everyday dorie, fish, savory

Here it is– our final Cook the Book Fridays posting! We started cooking from Everyday Dorie back in 2018, and at that time, I thought I’d just join in occasionally rather than cook my way through the whole thing. Having such a fun and dedicated group of buddies to cook and chat with really kept me motivated to show up (almost) every other week. I admit that I skipped six recipes, but I made over a hundred, so that’s not too shabby. I’ll miss it. Big thanks to Katie for tackling the admin duties.
Rosa Jackson’s Bourride is quite an elegant recipe to see us off. Bourride is a Provençal fish stew with aioli. This one has a mix of vegetables along with a nice chunk of fish (I used a thick piece of cod loin), and it’s really easy to cook since the veggie/fish combo basically steams in its own juices. I’m not the world’s best fish chef, so I appreciate a technique like this. A homemade aioli is added at the end of cooking to make a sauce. I put a pinch of turmeric into my aioli to boost the color for the photo, but maybe that boosted it too much?? It turned kind of neon…lesson learned. This was really so good, for everyday or for a special day.
For the recipe, see Everyday Dorie by Dorie Greenspan, and head over to Cook the Book Fridays one last time to see how the group liked this one.
Everyday Dorie: Citrus-Marinated Fish with Mango Salsa
February 22, 2024 at 10:46 pm | Posted in cook the book fridays, everyday dorie, groups, other savory, savory things, snacks | Leave a commentTags: everyday dorie, fish, savory

I have one last catch-up before our final Cook the Book Fridays recipe– Citrus-Marinated Fish with Mango Salsa. Dorie makes hers with halibut, but I couldn’t find that on the day I went shopping and used swordfish instead. The lemon-orange dressing used to marinate the fish also becomes a sauce that’s used to glaze it once it’s cooked…love the dual-purpose. My fish looked more like a steak in the end, as I added an unmeasured quantity of paprika to my marinade to stand in for the pinch of cayenne, which I didn’t have. The marinade took on quite a reddish color, which then darkened in cooking. It tasted good so I didn’t worry about it. The fish gets served over a bright, sweet and tangy mango and cherry tomato salsa that is a delicious accompaniment. Glad to have made this recipe, albeit two and a half years late!
For the recipe, see Everyday Dorie by Dorie Greenspan, and head over to Cook the Book Fridays to see how the group liked this one.
Tuesdays with Dorie BWD: Copenhagen Rye Cookies with Chocolate, Spice and Seeds
February 13, 2024 at 9:30 pm | Posted in BWD, cookies & bars, groups, sweet things, tuesdays with dorie | 10 CommentsTags: baking, cookies
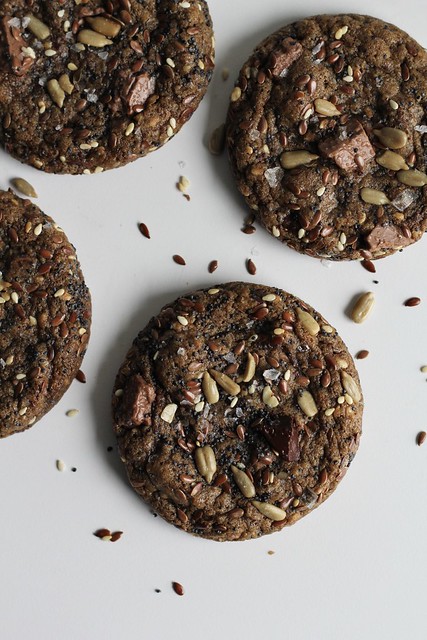
I am not loyal to one chocolate chip cookie recipe– I want to play the field and try them all. These Copenhagen Rye Cookies with Chocolate, Spice and Seeds are the latest to have caught my eye. At first glance, these seem pretty similar to the Mokonuts ones we made a couple years ago, but these swap the dried fruit for a strong hit of spices (coffee, cinnamon and cardamom) and use a mix of seeds (sunflower, flax, poppy and sesame for me). Dorie says you can put either milk or dark chocolate in these, so I naturally had to go with a combo. I’ve taken to usually creaming any spices in a recipe into the butter and sugar, rather than just stirring them into the flour. A lot like rubbing citrus zest into sugar, I feel like that bashing and smearing in the mixing bowl really makes spices pop, too. Creaming in the espresso powder at this early stage also helped to make my cookies look extra-dark. Before baking, I basically rolled the dough balls in more of the birdseedy mix (plus flaky salt) for good coverage, including on the bottoms. These cookies have so much complex flavor and a great texture with chewy middles and a crisp, toasted seed coating. Even if it is onto the next CCC, I’ll circle back to this one for sure.
If you don’t have the book Baking with Dorie: Sweet, Salty & Simple by Dorie Greenspan, get it and join us as we bake through it every second and fourth Tuesdays. Don’t forget to check out the rest of the TWD Blogroll!
Everyday Dorie: Lemon-Fennel Chicken in a Pot
February 11, 2024 at 11:11 pm | Posted in cook the book fridays, everyday dorie, groups, other savory, savory things | 4 CommentsTags: chicken, everyday dorie, savory

Lemon-Fennel Chicken in a Pot is the third Dutch oven-roasted chicken dish we’ve made. Kind of strange since they were all similar (a whole chicken cooked in a pot with some aromatics and liquid), but this was my least favorite of the three, and it seems like the most of the group also thought so.
I added a couple of carrots and potatoes to the bottom of the pot along with the fennel, lemon and shallots. Once the chicken was set on top of all that I think maybe I just had too much stuff in the pot. My chicken was sitting so high it was touching the lid in spots (and I ripped the skin off those spots when I took the top off the Dutch oven at the end of cooking–oops.). I don’t think it needed to roast for 90 minutes either, which was my bad, as I knew from the pan-sauce vinaigrette version that a small chicken would be done earlier, but I wasn’t paying attention. Anyway, it was fine and we ate it all up, but if I were to make something similar again, I think I’d really just take the pan-sauce version I mentioned above (that sauce was so good!) and add fennel.
For the recipe, see Everyday Dorie by Dorie Greenspan, and head over to Cook the Book Fridays to see how the group liked this one.
Everyday Dorie: Warm Squid Salad
February 2, 2024 at 4:45 pm | Posted in cook the book fridays, everyday dorie, groups, salads, savory things | 4 CommentsTags: everyday dorie, fish, savory

I eat a big salad most days; usually that means a hastily hacked up heap of lettuce, cuckes, tomatoes, and whatever other veggies I find rummaging through the fridge. This Warm Squid Salad is a little more refined and prepared with a bit more intention than those…a “weekend salad,” perhaps I’d say. I enjoyed making a pretty plate of quick-cooked squid, boiled baby potatoes, slices of avocado, celery and red onion, cherry tomato and bell pepper in a citrus dressing. I enjoyed eating it, too. I don’t cook squid often, but it was super easy to just give it a quick simmer. Also, it required basically no preparation since my fish guy sells it already cleaned. I like the tentacles the best (is that gross?), so I asked for extras. With the light dressing, this felt very fresh and healthy.
For the recipe, see Everyday Dorie by Dorie Greenspan, and head over to Cook the Book Fridays (this is a make-up recipe for me) to see how the group liked this one.
Baked Fresh Weekly

Blog at WordPress.com.
Entries and comments feeds.
